0. Intent
Intent的作用就是Activity之间信息的传播。
explicit intent
1
2
Intent intent = new Intent(this, Target.class);
startActivity(intent)Implicit intent
1
2
Intent intent = new Intent(action); //documentation有很多Activity action 可以查
startActivity(intent)Pass text in explicit intent
1
2
3
4
5
6
7intent.putExtra("message", value); //Put extra information in intent
//----------------------------------------------------------------------
Intent intent = getIntent();
String string = intent.getStringExtra("message");
// int intNum = intent.getIntExtra("name", default_value)
// 如果没有这个name, 那么getIntExtra会返回default_value
String getString = intent.getExtras.get("message");Pass text in Implicit intent
1
2intent.setType("text/plain"); //Type 和 Activity Action 安卓都会在AndroidManifest.xml自动查找匹配Activity用来给用户选择
intent.putExtra(Intent.EXTRA_TEXT, "messageText");更多Activity Action可以在Intent(Android Documentation)查看。
直接发送Implicit Intent时,如果安卓没有找到对应Activity,那么会报错。
为了解决这种情况,我们可以Create Chooser
Chooser
1
2
Intent chosenIntent = Intent.createChooser(intent, "Dialog_Message");
startActivity(choosenIntent);Implicit Intent和Chooser的区别
- Implicit Intent
- 在Activity filter中找到匹配Activity,并且用户选择后直接将Intent发给被选择的Activity。
- 在Activity filter中没有找到匹配的Activity,报错。
- Chooser
- 在Activity filter中找到匹配Activity,并且用户选择后,安卓将chosen activity发给原来的Activity。原Activity再将chosen activity的intent给安卓处理。
- 在Activity filter中没有找到匹配的Activity,Chooser提示没有匹配应用。
- Implicit Intent
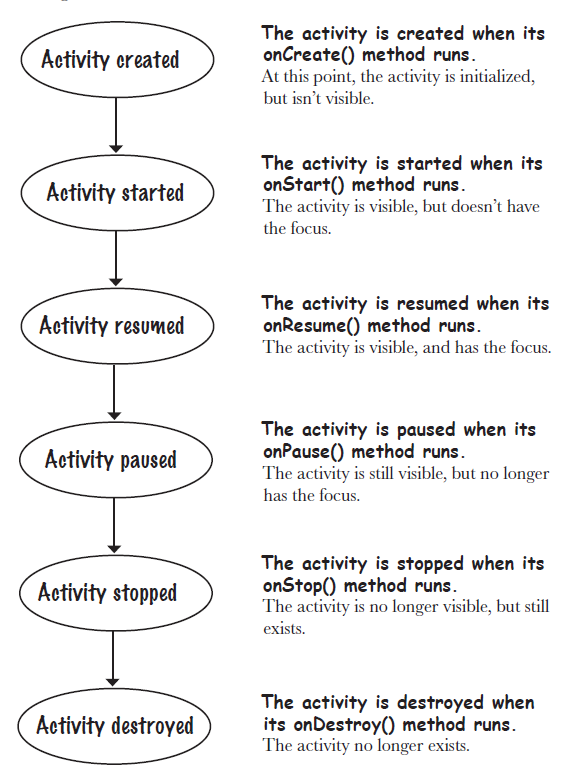
1. Activity Life Cycle
onCreate(): activity被创建后第一个被调用的函数。用于配置文件,环境等……
onStart(): activity被创建后第二个被调用的函数。可以将XML中的View组件都显示到手机上。
onResume(): 当前Activity获得了focus。
onPause(): 当前Activity失去了focus。
onStop(): 当前Activity停止了,(切换到了其他app或者切换到桌面,失去了支配权)
onDestory(): 当前Activity被摧毁。
onRestart(): onStop() —> onStart(),Activity又获得了支配权
2. User Interface
GUI components和Layout(View Group)都属于View, 所以都拥有View的特点。
那么我们可以对View做哪些操作呢?
- 得到View的属性
- 大小和位置
- Focus handling
- Event handling和listener
UI的构成就是由XML结构转化成由ViewGroup为root构成的View的hierarchical tree
3. Adapter和Listener和Handler
Adapter: 相当于MVC中的C,作用为连接UI和数据的桥梁。在Android中,Adapter以一种RecycleView的方式将数据放到UI的组件当中。(这里Adapter相当于一个转接头。比如ArrayAdapter的作用就相当于将Array转接成放置于ListActivity中的TextView列表)
1 | ArrayAdapter<String> arrayAdapter = new ArrayAdapter<String>(context, android.R.layout.simple_list_item_1, arrayList); |
Listener:用于Listen组件(View),不同的Listener有不同的作用,比如onClickListener就是为了Listen某个组件被点击,又如onItemsSelectedListener就是为了Listen多个组件中哪一个组件被选中的作用。Listener也包括对象和主动者。一般组件就是对象,而实现Listener的一方为主动者。
Handler: 可以理解为用来与Main event thread沟通的独立空间。在main event thread中创建了handler之后,在handler里面的code可以时刻保持与Main event thread的交流。达到改变UI的目的。
4. Fragment
因为Fragment在早期Android不存在,所以为了兼容性,Android添加getSupportFragmentManager()来获取Fragment的方法。
为了让Fragement更加flexible, Fragment必须减少对别的Fragment之间的交流。当需要和外交交流时,最好将包含此Fragment的Activity作为Listener,来处理Fragment与Fragment之间的交流。
Fragment通常是在FrameLayout之中进行switch的。
Fragment Transaction: getSupportFragmentManager().beginTranscation()获取。FragmentTransaction常用方法
1 | FragmentTransation ft = getSupportFragmentManager().beginTransaction(); |
为Fragment添加Tag, 便于找到最近的一个存在于Transaction中的Fragment:
1 | fragmentTransaction.replace(R.id.content, new_fragment, "tag"); |
FragmentTransaction也可以添加Listener,效果相当于监听返回键:
1 | getFragmentManager().addOnBackStackChangedListener(new FragmentManager.OnBackStackChangedListener() { //为Transaction添加Listener |
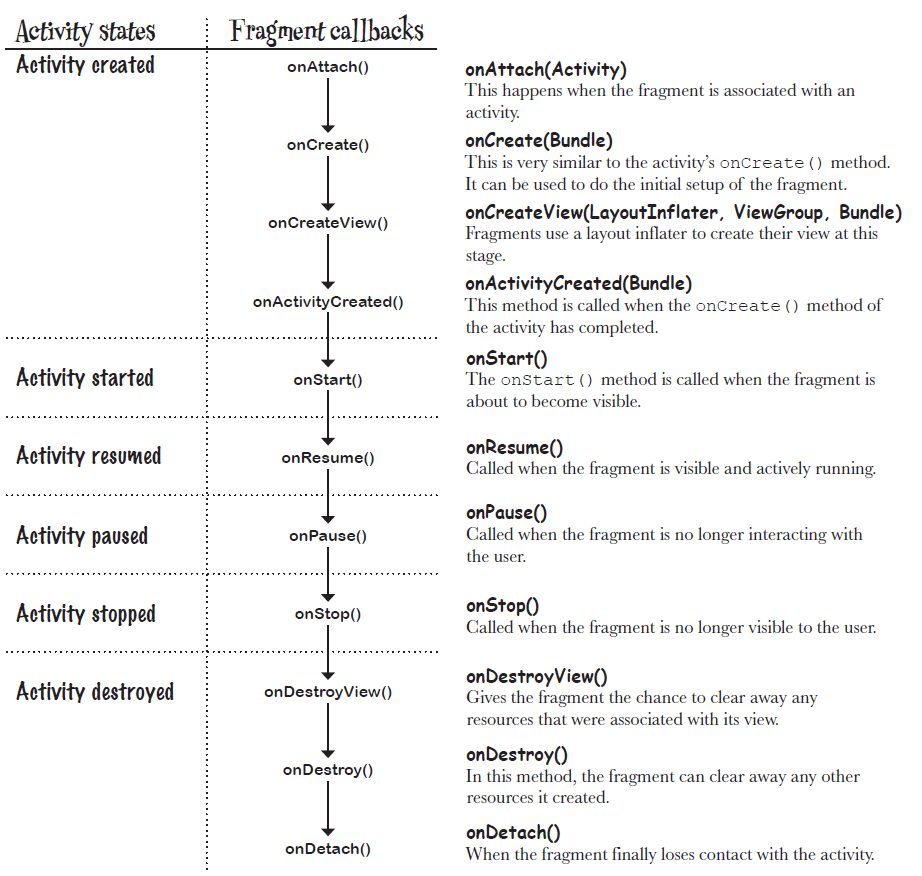
Fragment Life Cycle:
5. Nested Fragment
嵌套的Fragment需要用ChildFragmentTransaction形成嵌套的Transaction从而避免一次保存了多个Transaction导致程序错误。具体方法如下:
1 | FragmentTransaction ft = getChildFragmentManager().beginTransaction(); |
如果用getFragmentManager,效果相当于没有嵌套Fragment,Fragment仍然隶属于Activity。
onClick 只对Activity生效。在Fragment中,需要自己创建Listener实现点击函数(View.OnClickListener)。
Fragment的onCreateView()步骤在Transaction回复以后。
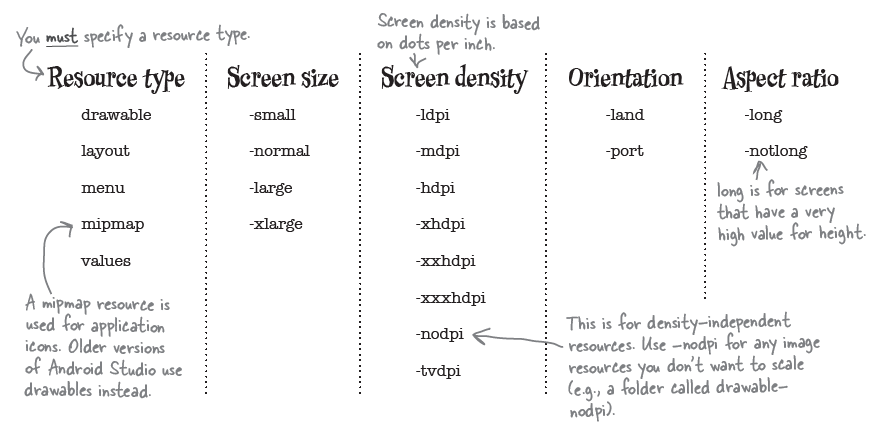
6. Screen-specified Resource File
7. Action Bar
Action Bar,顾名思义,就是存放Action的Bar。所以我们通常都是将一些Action(例如Edit, Search, Create…)放在Action Bar上面。放在Action Bar的好处就是可以在任何Activity中都可以直接操作这些Action而不需要返回Top Activity了。使得App更加方便,更加人性化。
不同版本的 Android API 对应了不同的Activity,如果要使用ActionBar就不能使用不存在ActionBar的Activity。所以需要extend支持ActionBar的Activity。而且不同的主题支持不同的Activity。这个时候我们就需要使用和Activity匹配的主题。
渲染(Inflate) Action Bar:
挑选支持Action Bar的Activity和Theme
创建menu文件夹,创建menu xml文件
在支持Action Bar的Activity里面Override onCreateOptionMenu(),在其中渲染menu
1
2
3
4
5
public boolean onCreateOptionsMenu(Menu menu) {
getMenuInflater().inflate(R.menu.menu_main, menu);
return super.onCreateOptionsMenu(menu);
}在支持Action Bar的Activity里面Override onOptionsItemSelected(), 在其中添加按钮事件
1
2
3
4
5
6
7
8
9
10
11
12
13
public boolean onOptionsItemSelected(MenuItem item) {
switch(item.getItemId()) {
case R.id.action_create_order:
// Event when create order item is selected
return true;
case R.id.action_settings:
// Event when settings item is selected
return true;
default:
return super.onOptionsItemSelected(item);
}
}
Action Provider: 顾名思义, Provider就是提供者。它们自己就是主角,例如ShareProvider就是他自己来将Intent提供给别的Activity。MenuItem成为Provider有两种方法
在XML中定义Item为ShareActionProvider:
1
2
3<item ...
android:actionProviderClass="android.widget.ShareActionProvider"
... />在Activity Code中实现
1
2
3
4ShareActionProvider shareActionProvider = new ShareActionProvider(this); //创建Provider
shareActionProvider.setShareIntent(intent); //给ShareProvider绑定Intent
MenuItem shareItem = menu.findItem(R.id.action_share);
shareItem.setActionProvider(shareActionProvider); //为Share的MenuItem绑定shareActionProvider
Up Navigation: 返回上一个Hierarchy。与Back键不同的是Back键返回的是上一个Activity,而Up Navigation返回的是上一级Hierarchy(Hierarchy在activitymanifest.xml里面设置)。设置方法如下:
1 | <activity ... |
1 | ActionBar actionBar = getActionBar(); |
在RunTime的时候更改ActionBar上的Title:
1 | ActionBar actionBar = getActionBar(); |
在RunTime的时候ReCreate MenuItem的Method:
1 | invalidateOptionsMenu(); |
在ReCreate Menu Item的时候,onPrepareOptionsMenu()会被调用,这个时候我们可以Override它来改变Update(recreate) Menu Item之后的样子。
8. Drawer
Drawer的XML:
1 | <androidx.drawerlayout.widget.DrawerLayout xmlns:android="http://schemas.android.com/apk/res/android" |
接下来操作便是在Activity Code里面给ListView绑定Adapter和Listener,从而实现ListView的文字和功能的呈现。
自动关闭DrawerLayout里面的Drawer代码如下:
1 | DrawerLayout drawerLayout = (DrawerLayout)findViewById(R.id.drawer_layout); |
设置DrawerListener最好的方法就是使用ActionBarDrawerToggle:
1 | ActionBarDrawerToggle drawerToggle = new ActionBarDrawerToggle(this, drawerLayout, R.string.open_drawer, R.string.close_drawer) { |
将ActionBarDrawerToggle绑定到drawerLayout上:
1 | DrawerLayout drawerLayout = (DrawerLayout)findViewById(R.id.drawer_layout); |
在左上角显示Drawer的Toggle:
首先在onCreate的时候设置显示Toggle。因为我们的DrawerLayout用了ActionBarDrawerToggle当作Listener,所以左上角的Up键会失效而不是返回的按钮:
1
2
3
4
5protected void onCreate(Bundle savedInstanceState) {
...
getActionBar().setDisplayHomeAsUpEnabled(true);
getActionBar().setHomeButtonEnabled(true);
}接下来要使用ActionBarDrawerToggle来处理Up Button被点击的事件:
1
2
3
4
5
6
7public boolean onOptionsItemSelected(MenuItem item) {
if (drawerToggle.onOptionsItemSelected(item)) { //Code to handle up button being clicked
return true;
};
// Code to handle the rest of the action
...
}
因为安卓自身的问题,我们需要在onCreate完成(即onPostCreate)时同步drawerToggle
1
2
3
4protected void onPostCreate(Bundle savedInstanceState) {
super.onPostCreate(savedInstanceState);
drawerToggle.syncState(); //同步drawerToggle按钮
}当Configuration改变时候,同时我们也需要改变drawerToogle的Condiguration
1
2
3
4
5
public void onConfigurationChanged(Configuration newConfig) {
super.onConfigurationChanged(newConfig);
drawerToggle.onConfigurationChanged(newConfig);
}
9. SQLite
组成: The SQLite Helper, The SQLite Database, Cursors
SQLite Helper:
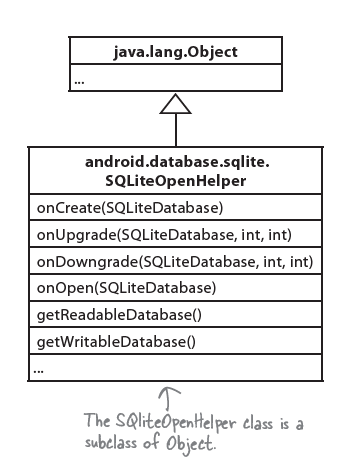
构造自己的SQLite Class
1 | public class StartBuzzDatabaseHelper extends SQLiteOpenHelper { //我们自己的DatabaseHelper叫做StarBuzzDatabaseHelper |
在SQLite里面创建Database, 用SQL Language:
1 |
|
在SQLite插入数据,需要使用ContentValues:
1 | ContentValues contentValues = new ContentValues(); |
往SQLite更新数据,使用 SQLiteDatabase update()
1 | //单个条件 |
往SQLight删除数据时,使用 SQLiteDatabase delete() method:
1 | db.delete("DRINK", |
当我们更新软件版本时需要更新数据库。或者新版本软件有BUG,我们需要将Database回退,我们应该怎么做呢?
这个时候,我们只需要改变SQLiteOpenHelper的Constructor里面的DATABASE_VERSION即可。DATABASE_VERSIO和SQLiteOpenHelper中的method调用关系如下:
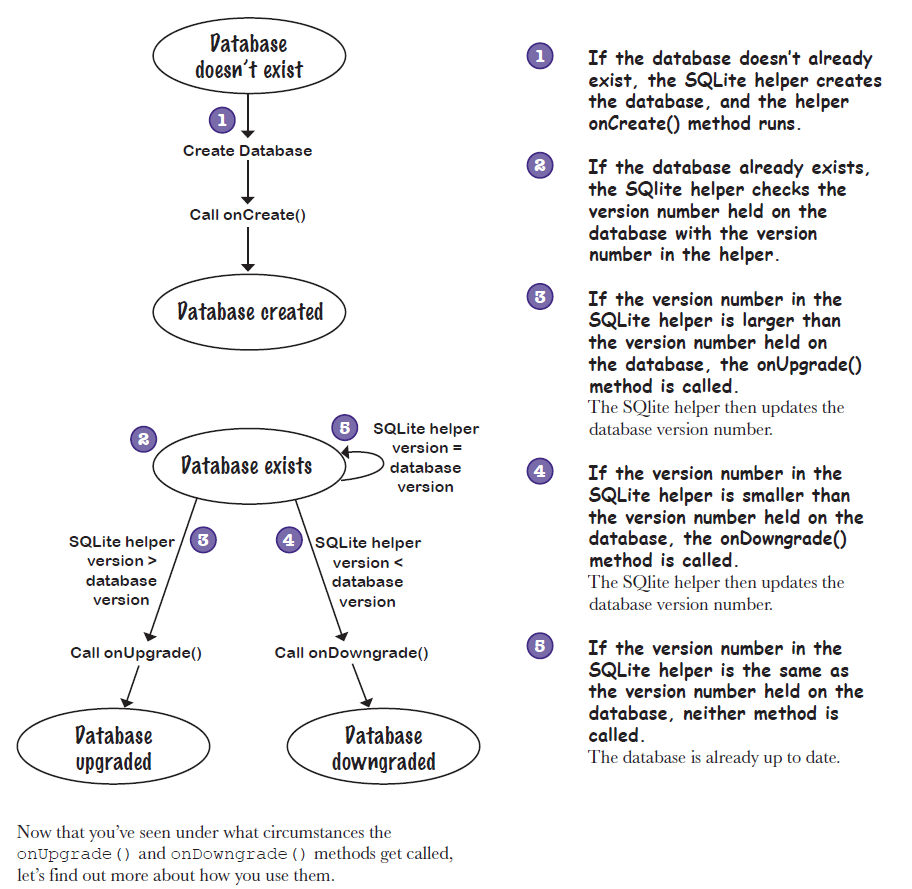
onUpgrade 和 onDowngrade两个method中的oldVersion都是指现已有数据库中的Version号。
1 | // oldVersion = 现有Database版本号 |
之前的insert, update 和 delete都是改变数据库中的Records。接下来就是如何改变Database的Structure了。
在改变Database的Structure时候,我们要使用SQL Language因为Android并没用帮我们实现这些方法。
1 | db.execSQL("ALTER TABLE DRINK ADD COLUMN FAVORITE NUMBERIC"); //在DRINK表中添加FAVORITE列 |
在SQLite中,我们可以使用SQLiteDatabase query(…)来获得cursor:

常见的查询语句:
1 | //获取所有rows |
同时query(…) method支持SQL functions:
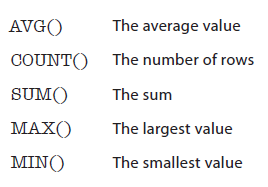
使用方法类似SQL Select语法:
1 | //统计行数 |
有两种从SQLiteHelper中获得SQLiteDatabase的方法: getReadableDatabase() and getWritableDatabase()。区别如下:
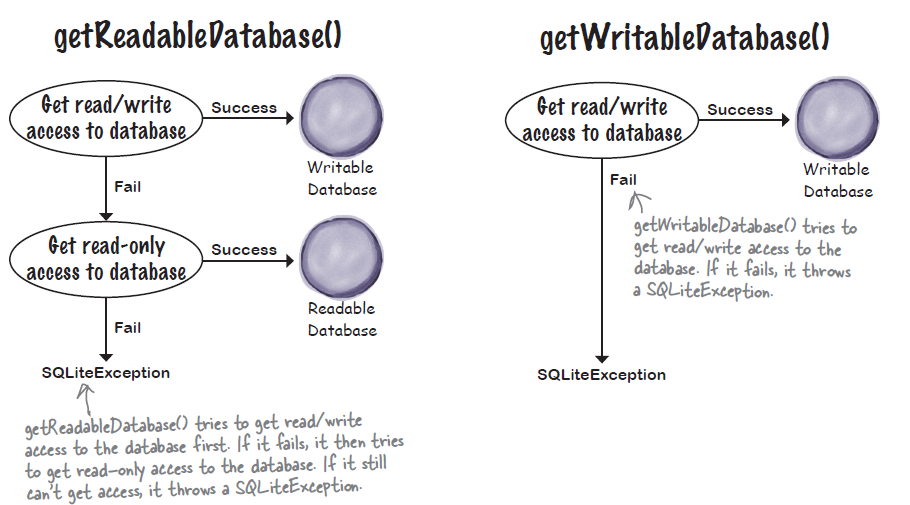
所以我们最好是只需要Read的时候获取ReadableDatabase,只需要Write的时候用WritableDatabase
在得到Cursors之后,我们需要Navigate to指定的tuple。有四个method可以使用:
1 | if (cursor.moveToFirst()) { |
最后,我们需要获得cursor里面的value,使用get**(int column index)方法:
1 | String name = cursor.getString(0); //假设第一列是NAME STRING |
使用完之后记得close cursor和database
1 | cursor.close(); |
在使用CursorAdapter时,其绑定的cursor必须要有一列Primary Key来IDentify每一行, 因为这个primary key会用作List的id
创建CursorAdapter我们经常用SimpleCursorAdapter()。构造函数如下:
1 | SimpleCursorAdapter adapter = new SimpleCursorAdapter(Contexe context, |
获得cursor后,Database的改动并不会影响到cursor。
CursorAdapter changeCursor(newCursor): 使用此方法可以更新View绑定的Adapter
1 | CursorAdapter listAdapter = ((ListView)findViewById(R.id.list1)).getAdapter(); |
在Android Liplop之后,我们需要考虑3种Thread

我们如果把加载Database放在OnCreate里面,则相当于在Main event thread中加载数据库。可是main thread还要处理屏幕点击。数据库过大会导致app点击卡顿。
所以这个时候我们需要把数据库加载放在自建的Thread中。AsyncTask可以解决这个问题。
1 | private class MyAsyncTask extends AsyncTask<Params, Progress, Result> |
10. Service
有时候,我们想在Bakcground运行一些代码。我们可以自己创建一个线程在Background运行。但是这样做会使得Avtivity里面的code很难阅读,容易出错。所以Service的发明很好的解决了这个问题。
两种Service Type:
Start services
可以在background一直run,直到task结束。不被activity限制。即使activity onDestory()了,依旧可以在Background运行。
Bound services
必须与Activity中的component绑定在一起,与component共生共灭。
在Android里面,有两种class对应这两种类型的Service:
- IntentService: 对应start srvices
- Service: 对应bound services
首先介绍IntentService:
IntentService中的 onHandleIntent(Intent intent) 就是在Background run的code。
如果Service需要与Main event thread进行交流,那么Service中的onStartCommand()在每次启动服务时都会被Main Event Thread 调用。
所以IntentService的具体用法如下:
1 | public class MyService extends IntentService { |
getApplicationContext()获取的是当前屏幕上的Context。如果想在任意当前屏幕显示Toast,可以使用它:
1 | Toast.makeText(getApplicationContext(), "Show text", Toast.LENGTH_SHORT).show(); |
接下来就是介绍如何使用系统的Notification Service了。
首先,我们需要自己创建一个notification,需要指定Channel ID:
1 | public static final String NOTIFICATION_CHANNEL_ID = "channel id"; //指定Channel ID |
其中我们可以看到notification中的contentIntent设置的是Pending Intent。因为Pending Intent是用处是触发某件事情才会被start。这里的notification也是需要点击才start intent,而不是notification跳出来直接就start intent了。所以我们这里需要用pending intent。
那么如何获取Pending Intent呢?一下是一种方法:
1 | Intent intent = new Intent(this, MainActivity.class); //创建一个Intent |
最后,我们只需要把notification传送给notification service。再Android O之后,我们需要设置notification Channel,notification才能再指定的Channel里显示:
1 | public static final String NOTIFICATION_CHANNEL_ID = "channel id"; |
接下来介绍Service:
Bound Service 流程如下:
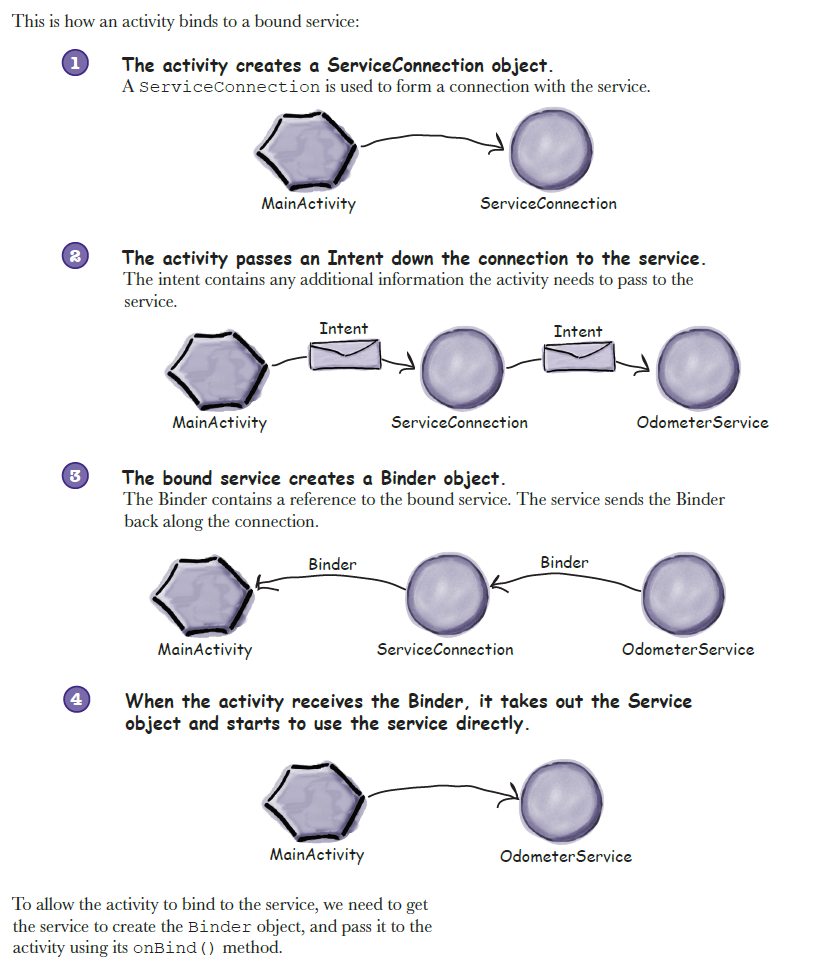
首先我们先创建我们的MyService并继承Service:
1 | public class MyService extends Service { |
当ServiceConnection连接上时,调用onBind返回Binder对象,为了Activity可以拿到MyService,我们需要将MyService的Reference放到Bind对象中:
1 | public class MyService extends Service { |
如何获取系统自带Location Service中的位置信息,并创建Listener取Listen Location Service的变化:
1 | private Location lsatLocation = null; |
在Activity中要如何与Service进行绑定呢?
首先,在Activity中创建ServiceConnection对象:
1 | private boolean bound = false; |
创建完成后,我们需要连接connection,以及使用完毕后关闭connection
1 |
|
如何获取权限呢?
1 | ActivityCompat.requestPermissions(MainActivity.this, |
1 |
|
11. RecyclerView
RecyclerView的特点:Scrollable。 RecyclerView中看不见的view可以重复使用,而不是像ListView那样一直创建新的view。所以RecyclerView更加节约内存。
RecyclerView的缺点就是自己并没有已经实现的Adapter,我们需要自己创建Apdater继承RecyclerView.Adapter。这也同样是优点,这样我们就可以自定义Adpater中的View了
1 | public class CaptionedImageAdapter extends RecyclerView.Adapter { |
接下来就是如何在recyclerView中绑定Adapter了:
1 | public View onCreateView(LayoutInflater inflater, ViewGroup container, |
在创建好RecyclerView之后,那Recycler View是怎么处理点击事件呢?
因为Recycler View只是一个容器,所以我们如果要处理点击事件,我们只要在出现View的时候给View绑定上Listener就好了。
那么我们就需要在Apdater中的onBindViewHolder给View绑定上Listener就ok了
1 | public class CaptionedImageAdapter extends RecyclerView.Adapter { |
12. ViewPager
ViewPager的Adapter:
1 | public class TabsPagerAdapter extends FragmentPagerAdapter { |
在Activity中绑定FragmentPagerAdapter:
1 | ViewPager viewPager = (ViewPager)findViewById(R.id.view_pager); |